August 21, 2009

What's your favorite PICKUP line?
[C'mon, everyone has one, so fess up!]

Ours (at least in the office) is:
copy serverstatus.eml \\myTransportServer\Pickup

Do you have a need for an easy method of sending a message from within your Powershell scripts? Do your automated procedures report their results to you via email? Do you want them to? Details? Summaries? Have you used the pickup folder to send messages from your monitoring or mailbox processing scripts? If not, you should be. Read on to see how easy the process can be, especially for you Exchange Admins.

Here at ITEC, we host mailboxes for a few campuses and SUNY entities. Automating procedures helps us to provide consistent, and faster service to our customers. Scripting as many procedures as possible helps in standardization and minimizes the chance for error. However, automated processes can sometimes go on without monitoring and without an administrative eye watching over them. Notification from these automated procedures is sometimes critical to system health as well as customer satisfaction. An easy way to use your Exchange environment to deliver status messages and reports is to use the PICKUP folder on your Exchange Transport server.

First, we should create a share that points to the pickup folder on one of your transport servers to use as your drop folder for system status messages.


Format your message following RFC-822 standards as shown below, naming it with an .eml extension, then copy it to the pickup share to be delivered by the Exchange transport server. We use a Powershell function (discussed later in this article) that we've written to make our mailer procedure transportable, but you can easily put the code inline in your reporting script.

From:
To:
S
ubject:

Message body here. (Content from your report file)


Make sure there is a blank line between the Subject: line and the start of your message body... that's all there is to it. Exchange monitors the pickup folder for new messages and processes them as long as they are formatted correctly. We use a script to build the output file with very simple Powershell write-output cmdlets.


Building the email message takes no more than the few Powershell lines shown below. After the output .eml message file is created, it's simply a matter of copying the file to the pickup share for processing.


$Msg = "MyMessage.eml"
$MsgBody = Get-Content C:\temp\MyReport.txt
$MsgDisclaimer = "Some company mumbo jumbo..."
write-output "From: $fromaddr" out-file $Msg -encoding ASCII
write-output "To: $toaddr" out-file $Msg -encoding ASCII -append
write-output "Subject: $subj" out-file $Msg -encoding ASCII -append
write-output "`r`n" out-file $Msg -encoding ASCII -append
write-output " -Automated Msg -" out-file $Msg -encoding ASCII -append
write-output $MsgBody out-file $Msg -encoding ASCII -append
write-output $MsgDisclaimer out-file $Msg -encoding ASCII -append
Move-Item $Msg -destination \\MyTransportServer\PickupShare\


Using a function to build and send the message makes calling the mailer easier and allows us to use it in many different procedures. Our version of the function (to be discussed in a future post see Note below) includes detailed help as we anticipate the function being used by several staff from within many different scripts.


Note: The post to discuss ITEC's custom function for sending using the PICKUP folder will be replaced by a post about the Powershell v2 cmdlet Send-MailMessage, which we will discuss instead.


.end

more...

July 1, 2009

OWA Session Timeout Ticking You Off?

Are your users complaining about the short session timeout for Exchange 2007 Outlook Web Access? OWA users who have selected the "This is a private computer" login option either from home or at the office are subject to the default 10 minute session timeout. Use this easy fix to increase the value to something more acceptable to your users (if your local security policy allows it) say... 8 hours?

As you may know, Powershell can access the Registry directly, just as it can access the file system. There are two predefined psdrives available when you load Powershell that point to the Registry hives HKEY_LOCAL_MACHINE (HKLM) and HKEY_CURRENT_USER (HKCU). You can add others if you choose by configuring your Powershell user or machine profile.

To use Powershell to add (or change) an entry in the registry to increase the OWA session timeout for "trusted" clients to 8 hours (480 minutes), use the Exchange Management Shell and type the following command or use Regedit: (the usual warnings apply)

New-ItemProperty -Path 'HKLM:\SYSTEM\CurrentControlSet\Services\MSExchange OWA' -Name TrustedClientTimeout -Value 480 -Type dword

Restart IIS from a command prompt using iisreset /noforce and your users will love you.

.end

more...

June 18, 2009

Confluence Automation with Powershell
[aka Scripting your Wiki - Part I of a series]

For those of you who use the Confluence wiki to maintain documentation, this post will show you how we at ITEC use Powershell scripting to automate reports and build pages using the Confluence Command Line Interface (CLI). The Confluence CLI is a Java based set of procedures for automatically creating/updating pages in your Confluence spaces.

We have several systems that report their status to various tools that generate reports for internal staff. Read on for details on how we use Powershell and the Confluence CLI to automate documentation for internal system status reporting as well as usage statistics for campus applications that we host.

How We Use It
Responsible for managing and maintaining our Exchange environment as well as our hosted mailboxes, I am always looking for ways to streamline procedures and to minimize the chances of human error through automation. The discussion that follows shows a detailed example of how we use both Powershell and Confluence to produce high quality, accurate, and timely system status information for our campus customers.

Exchange Mailbox Status Reporting
The goal here is to provide our campus customers easily accessible, up-to-date information on the status of their mailboxes. Information such as current mailbox sizes per user, mailbox forwarding, time of last logon, etc.

to be continued...

more...

June 13, 2009

Understanding Powershell Profiles


Powershell uses profiles to configure the user experience. There are two main profiles that are typically configured, the machine profile and the user's personal profile.

MSDN has a nice description of the different profiles found in Powershell. You can pre-define variables, drive mappings, custom functions, etc. Shared routines can be loaded into the machine profile to provide access to ANY Powershell user on the system.

The machine profile is found at
%windir%\system32\WindowsPowerShell\v1.0\profile.ps1
and is used to configure the Powershell session for ALL users on the system. I generally use the machine profile to define custom functions that should be available to anyone who logs onto the box and will use Powershell. Examples could include writing a custom function and add it to the machine profile on a domain controller that would open a csv file or make a database connection, read its data, and create a new AD user, configure a home directory on a file share for that user, and add them to the appropriate security groups.

Another example would be writing a function that lives in the machine profile of an Exchange server, available to ALL admins who log onto the machine. I have a custom script that I've turned into a Powershell function for planned failover of our clustered mailbox servers. The script (function) takes input from the admin, verifies that the target node is not already the active node, displays the status of the cluster copy queue, then warns the admin that this procedure will failover the production mailbox cluster. No browsing folders searching for the location of the failover script... when it's defined as a function, it's available from any location.

The user personal profile is found at
%UserProfile%\My Documents\WindowsPowerShell\Microsoft.PowerShell_profile.ps1
and is used to configure the user's personal settings. Screen color preferences, personal drive mappings (psdrives) , and functions that should not be made public on that system. Security Credential Objects that will be used within the Powershell session can also be defined here.

You can edit this profile with any standard text editor such as Notepad, but there are many IDE applications available to make script editing easier. Powershell 2.0 includes a builtin IDE.


Notes for this post
Get a quick reference here.

.end

more...

June 12, 2009

Working with CSV Files


Working with CSV file content in Powershell is a perfect match, and very easy and efficient. Reading data from a csv file for use in Powershell is done using the Import-CSV cmdlet. The data is read from the file and stored in an object that you define.

Consider the following users.csv file content:

FNameLNamesamAccountNamePrimarySMTPAddress
JohnSmithsmithjsmithj@contoso.com
MaryJonesjonesmjonesm@contoso.com


To import the data from the users.csv file into an object called NewUsers, use the following Powershell cmdlet syntax...
$NewUsers = Import-CSV users.csv

After the import, you will have an object called $NewUsers to work with in Powershell. You can display the entire contents by typing the variable name $NewUsers.

You can process the entries individually by using the ForEach statement shown below:
ForEach ($User in $NewUsers) {write-host Email $User.Fname $User.LName at $User.PrimarySMTPAddress}

Output from the statement above would produce:
Email John Smith at smithj@contoso.com
Email Mary Jones at jonesm@contoso.com

Although this is a very simple example, it shows how easy it is to work with csv file data in Powershell. We make extensive use of csv files in our Exchange hosting environment for creating new mailboxes for our campus customers as well as modifying existing users, distribution groups, forwarding addresses, quota, etc. It works well for use and has made day-to-day mudane tasks much easier to process.

...more to come in our Bulk User & Mailbox Management post.

more...

June 11, 2009

Be a Hero, take charge and Get-Proactive


There are many things that you can do to be proactive with your Exchange environment and make yourself look like Wonder Boy to the higher ups, and to your customers. Here is a list of some things you can do to support your cause.

The Hero List

Produce a list of users with mailbox folders containing more than 5000 items (performance limit for Outlook folders)

Intercept Delivery Failure messages from users by creating a Transport Rule to forward a copy of the Failure message to your admin mailbox. React to the problem before your users complain.

Generate a report of all mailboxes that have not been logged onto in the past 90 days.


.end

more...

June 9, 2009

Hey dude, is your #550 cataddr: string too long?


Are you experiencing delivery problems from your Exchange 2007 servers to IBM.com and other sites using Sendmail 8.x? Is the error "#550 cataddr: string too long" being returned when users try to send to certain domains?

The problem (as worked through by our colleague Brian at SUNY Canton with HP Support) was tracked down to be a TLS negotiation issue between Exchange and Sendmail. Apparently there is a fix for Sendmail, but if you're running as an admin on the Exchange side, you'd rather not have to contact all the Sendmail site admins that you exchange email with and have them "fix" their systems.

Read on for a workaround from Brian, as well as a thought that I had for an alternate solution.


Brian's Solution from working with HP Support:
Set-SendConnector "Internet" -IgnoreStartTLS $true
Sets the default "Internet" send connector for ALL internet mail to ignore TLS negotiation.

My Alternate Suggestion:
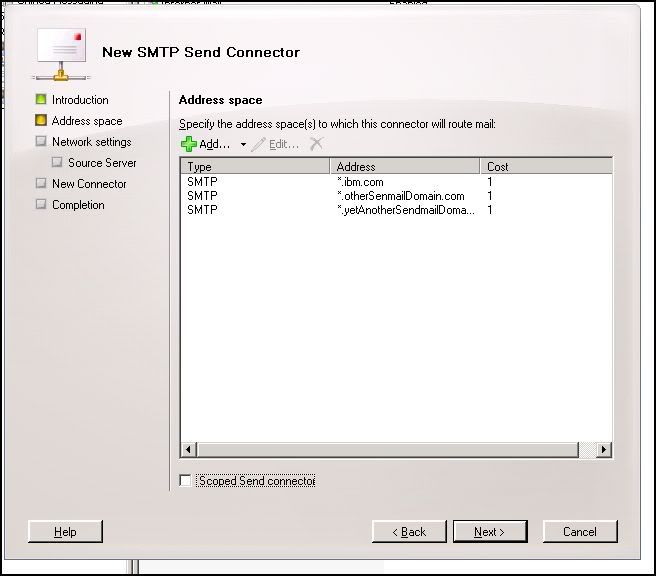
Create a custom send connector that will be used for ibm.com (and other domains that are deemed problematic to this issue) and turn off TLS negotiation for that connector only. Other domains that are found to exhibit the same problem can easily be added to the custom connector via the Exchange Management Console (or through Powershell) when discovered.


Was this helpful? Please leave a comment.
.end

more...

June 7, 2009

Powershell 101 - Setting Up
[Part I in a series to get you started]

If you're using Vista, Windows Server 2003 or earlier, you must install Powershell into your OS. Requirements are .Net Framework 2.0 or higher and Powershell 1.0. Both are available as downloads from Microsoft. To install Powershell v2.0 you'll need .Net 3.5 to support the new "remoting" features (See the updated download link at the bottom of this post).


Getting Started
If you expect to be running Powershell scripts on your system (and why wouldn't you), you'll have to modify the default setting for ExecutionPolicy. By default, Powershell restricts the running of ALL scripts for security reasons. To allow only local scripts to run, set the policy to RemoteSigned. With this set, only scripts local to your system will be allowed to execute. To set this policy, type the following at the Powershell prompt:
Set-ExecutionPolicy RemoteSigned

Useful Cmdlets to Get You Started
Get-ExecutionPolicy
Will display the current policy set on your system.

Get-Command
Will display all available cmdlets on your system.

Get-Help...
Displays help information for cmdlets & topics.

Get-PSDrive
Displays all logical drives on your system.

Get-PSSnapin
Displays Powershell Snapins (specialized shell cmdlet libraries) that are loaded in your current Powershell session.

Get-PSSnapin -registered
Displays Powershell Snapins that are installed and available on your system and can be loaded in your session using the Add-PSSnapin cmdlet.


[Resources in this post]
Get Windows Management Framework here.
Powershell Quick Reference Card here.

.end

more...